Installing Ghost on OpenShift
Note This post is being written with the intention of keeping a personal record of the actions performed in my particular environment, meeting a set of conditions which I’m not sure I’ll be able to point out in every case. Including ruby, git and node.js version; operating system and so on. OpenShift provides plenty of documentation regarding these options which I will try to refer, and which I strongly recommend to consult before trying to perform any modification in any other particular environment.
Installation and configuration of the Client Tools
Once we have verified that Ruby and Git are available in our system we can install the OpenShift gem.
$ sudo gem install rhcOnce the installation has completed, run:
$ rhc setupConfiguration of the Client Tools
We’ll be prompted to enter our login information. First we have to enter the email account that we have previously used to sign in to the OpenShift platform.
Login to openshift.redhat.com:And next our password:
Login to openshift.redhat.com: email@account.com
Password:******
For details on this process please refer to the link above. In a summarized way I think I was asked if I wanted to generate a token, which I accepted by typing yes and pressing enter. Then the wizard outputs the path in you local system where the configuration file that contains your credentials, has been created. Then when your SSH keys have been created, you are prompted with this question which I accepted.
Your public ssh key must be uploaded to the OpenShift server to access code.
Upload now? (yes|no) yes
And by the end of this process you are able to choose a domain.
Please enter a domain (letters and numbers only) |<none>|: MyDomain
Your domain name 'MyDomain' has been successfully created
Creating the Ghost application
To setup Ghost as an application on your OpenShift’s account cd to the folder holding your other local projects. In my case $ cd ~/Sites and type:
Note Where ghost will be the domain that will be followed by the domain chosen when configuring the client tools, both adding to something like ghost-mydomain.rhcloud.com which is the url where you will be able to access your Ghost application. As well as the name of the folder that will be created in your local system holding a cloned repository of the public site. You can change it to anything you prefer.
$ rhc app create ghost nodejs-0.10 --env NODE_ENV=production --from-code https://github.com/openshift-quickstart/openshift-ghost-quickstart.gitRunning the Application Locally
As explained in the README.md file of the Github repository linked above. The Ghost repository cloned to ~/Sites/ghost is missing two folders. If we open the .gitignore file from the root folder, we see they should be inside the content folder, so we can add them to our local installation since we aren’t facing the risk of overwritting any of them when pushing changes from local to the live site. So inside the content folder I added an images folder and a data folder. Then I removed the node_modules folder and added it to the beginning of the .gitignore file.
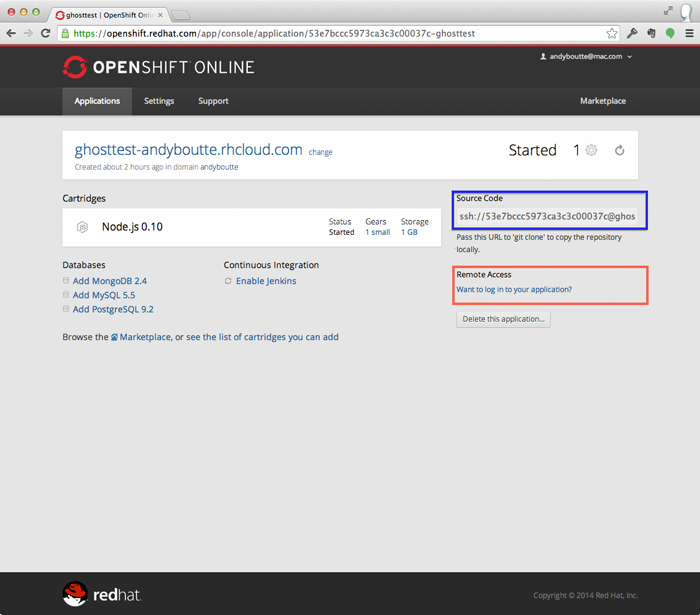
If you log in to your OpenShift account and go to applications. You must see that you have one application called ghost. If you click on the name ghost. You enter to another very similar screen. In the right sidebar highlighted with red in the image next. If we click the link “Want to log in to your application?”

Then we can select and paste the credentials we need to connect to our hosting with ssh they should be something like
$ ssh 666ddddsgytsyvus@ghost-mydomain.rhcloud.comIn order to check the version of Node.js that our server is running we can enter
$ ssh 666ddddsgytsyvus@ghost-mydomain.rhcloud.com node -vThat should output the node.js version. In my case the node.js version was 0.10.25. My local environment node.js version was verified by typing:
$ npm -vSince I had to downgrade a version because I was running locally node v0.10.26 .I followed the next tutorial on how to install n which is an npm module for managing node.js versions.
Note I do not fancy much this step. I can’t say yet if this can get me into further problems regarding my other local projects
Once I verified that my local node.js version was as well 0.10.25. I deleted my node_modules folder and typed:
$ npm install --productionAt this point I could at last run the Ghost app locally without any errors showing up:
$ npm startThen I runned:
$ git rm -r --cached .Then:
$ git add .Next
$ git statusAnd the node_modules folder displayed as deleted from the git directory tree.
$ git commit -m 'added my custom theme'Note To make sure that pushing the local repository to the public site didn’t break any of the installations I pushed a folder containing a custom theme.
$ git pushThen I logged into my live site and was able to select the custom theme from the settings pannel without breaking anything. So the code was uploaded correctly.